Main Screen
In the main screen of Agile Work Management, it is possible to perform several actions. To access the main screen, click on the lightning bolt icon on the left side menu.
In the top right corner are two buttons for Add Workspace and Add PI Planning, and at the top of the screen is a box for Search and Filter options.
Home
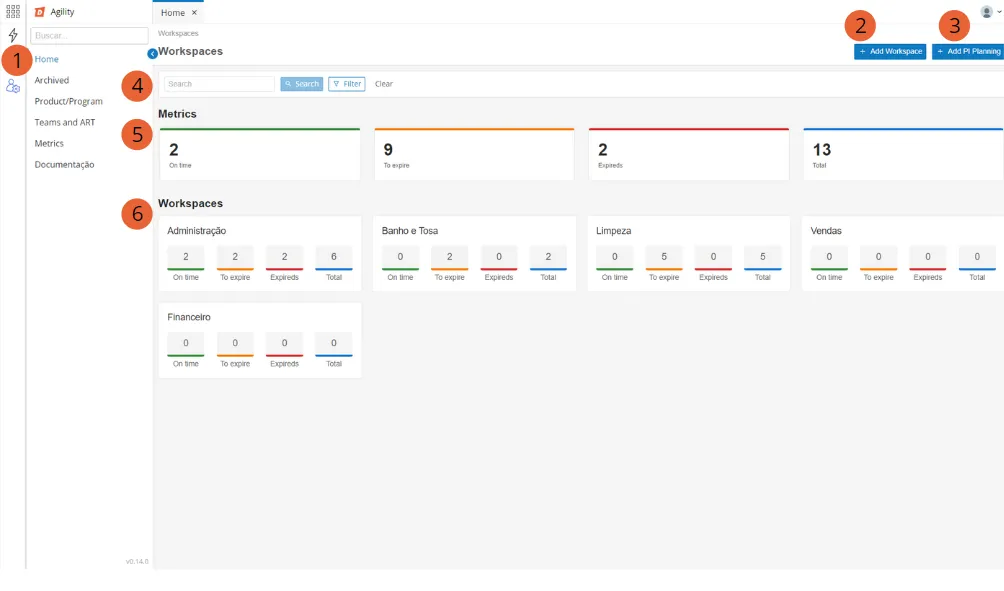
Field | Description |
|---|---|
1. Menu | Side navigation menu |
two. Add Workspace | Button to add information about a new workspace |
3. Add PI Planning | Button for adding information about a new PI Planning |
4. Search | Search box |
5. Metrics | Metric information from all workspaces and PI Plannings |
6. Workspaces | List of Workspaces and PI Plannings |
2. Add Workspace
After clicking on the Add Workspace button, a pop-up screen will appear, requiring you to include:
- The name for the new Workspace;
- Select members;
- Cancel or Save;
3. Add PI Planning
The Add PI Planning button allows you to insert a new item from this category. some information for the new PI Planning must be filled in:
- Enter a name;
- Select a Program or Product from the list offered;
- Set the start date by clicking on the calendar icon;
- Choose the size of the Sprint in days;
- Choose the number of Iterations (minimum 2 and maximum 12);
After entering this information, click Next.
The next step is to Add Art's. For that choose 1 or more Art's from the list.
The third step will be to fill in the Iterations information.
- Enter a name for the Iteration;
- The number of iterations and the start and end dates will be defined automatically according to the start date, the sprint size and the number of iterations, defined in the previous step;
The last step is to select the members. After completing all the steps, click Create to finalize the creation, or cancel if there is any error in the information.
4. Search and Filters
The Search field lets you search by name or apply filters. The search will be done across all Workspaces, Projects and Tasks. The filters button allows you to filter by deadline, defining a start date and an end date, which will also be applied to all Workspaces, Projects and Tasks. There is also a button to clear any applied filters.
5. Metrics
The initial screen will display a summary of the established deadlines for all workspaces of the logged in user.
- On deadline: shows the total of Tasks that have a "Delivery date" greater than 24h from the date
- Due: shows the total of Tasks that have the "Delivery date" that will be due in 24 hours from the current date/time;
- Overdue: shows the total of Tasks that have the "Delivery date" less than the current date/time;
- Total: sum of all Tasks;
6. Workspaces
Below the metrics section, you will see a list of all Workspaces and PI Plannings.
Each Workspaces or PI Planning will display its metric:
On time: shows the total of the Tasks of that Workspace or PI Planning, which have the "Delivery Date" greater than 24 hours from the current date/time;
Due: shows the total Tasks of that Workspace or PI Planning, which have the "Delivery date" that will be due in 24 hours from the current date/time;
Overdue: shows the total of Tasks from that Workspace or PI Planning, which have the "Delivery Date" less than the current date/time;
Total: sum of all Tasks of that Workspace or PI Planning;
Select a Workspace or POI to view more information: Check out the Workspace doc.