Workspace
Workspace represents a workspace of an organization area. Workspace gathers each Project, which in turn gathers each Task.
From the Main Screen, select one of the Workspaces or PI Planning to view more detailed options for each Workspace.
Before starting
You must have a workspace created to access the screen.
Procedure
Go to Menu Home > Workspaces;
Click on "Create Workspace" to add a workspace of your choice;

In the example above, a Workspace was created to only take care of the Perfuming of a Pet Shop.
List Tab
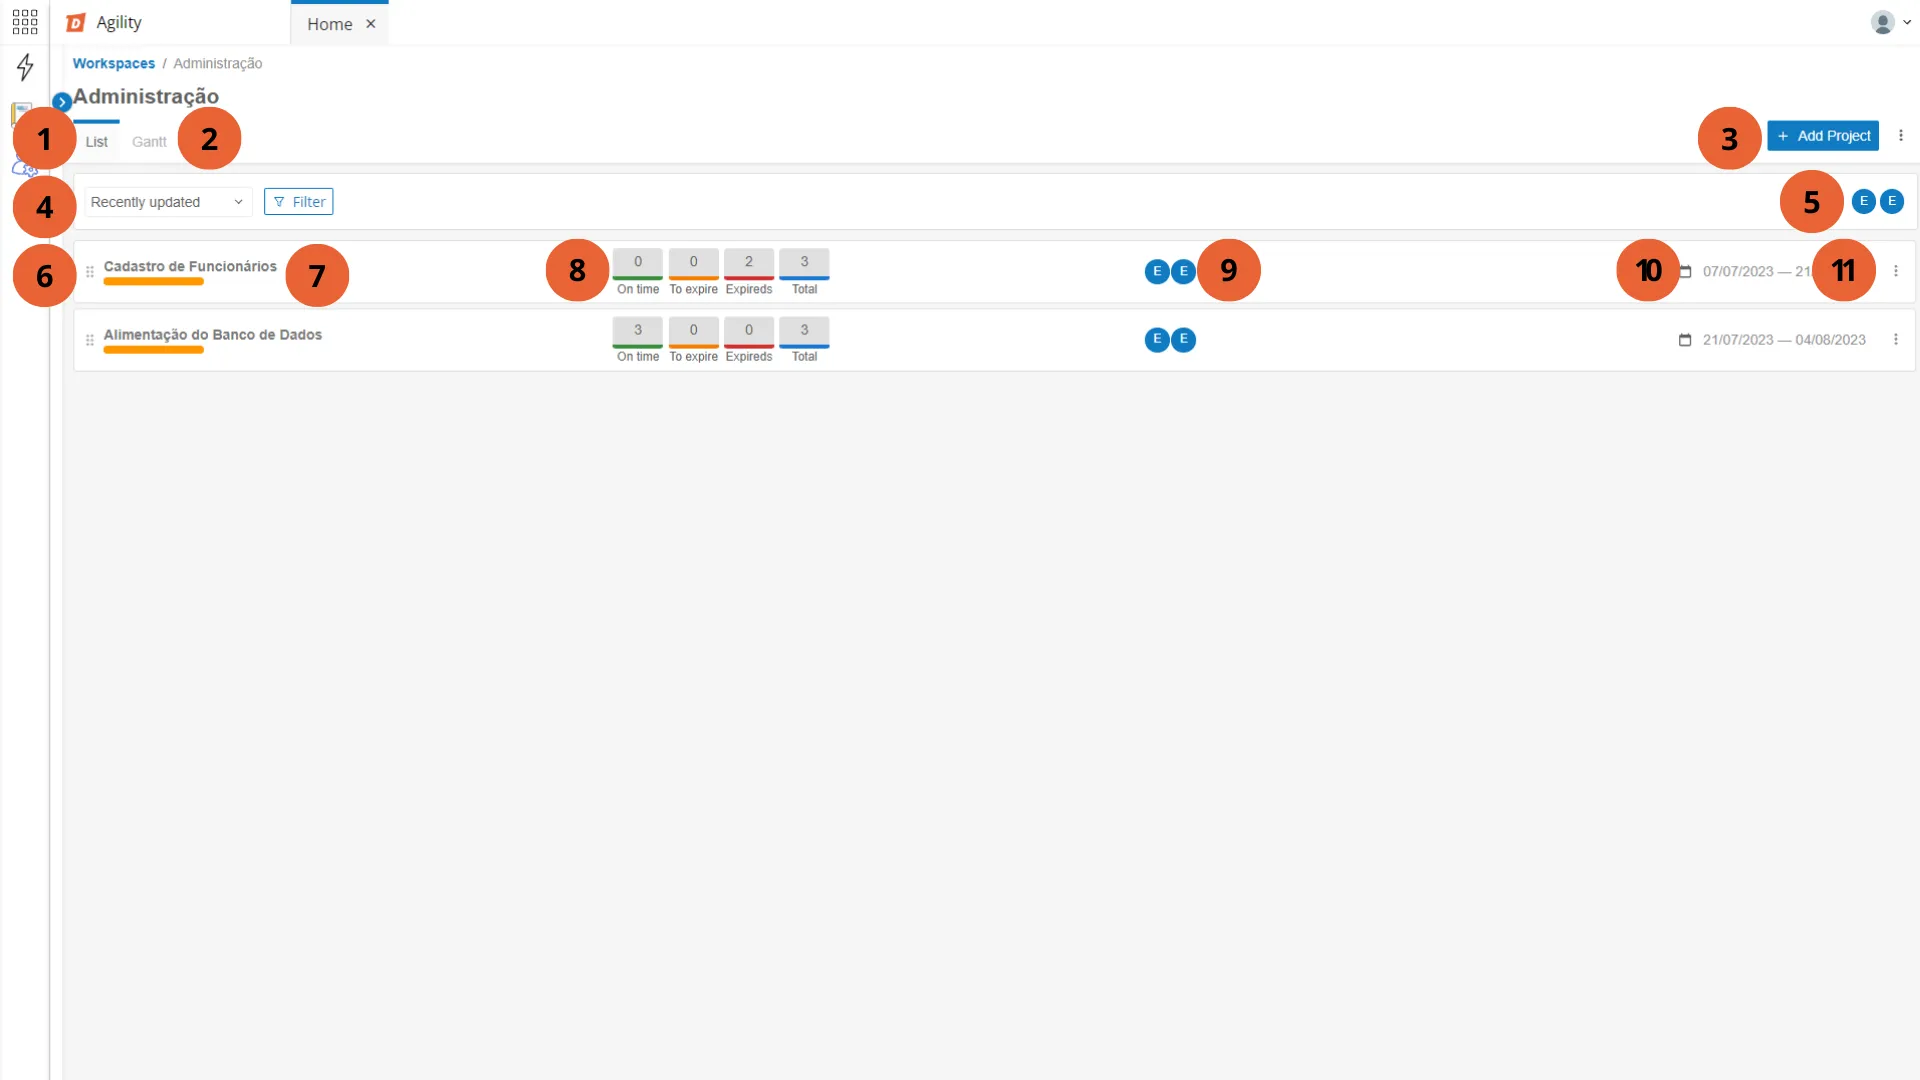
Field | Description |
|---|---|
1 - List | Displays the list of workspace projects |
2 - Gantt | Shows Gantt progress bars |
3 - Add Project and Options | Click here to add a new project, or click on the three dots to view more options. |
4 - Order and Filters | Select the View Order and filters to be applied to the list of projects. |
5 - Workspace Members | Icons showing members involved in all workspace projects. |
6 - Project List | List showing all projects in the current workspace. |
7 - Project Name and Progress | Project name and task completion progress bar. Click and drag the dots icon next to the project name to change the order. |
8 - Metrics | Visualization of Project Metrics. |
9 - List of Project Members | Icons showing members involved in the project. |
10 - Project Start and Delivery Dates | Earliest task start dates and last task due date in the project. |
11 - Quick View | Click on any project area for a compact view of project tasks. |
2. Gantt tab
The Gantt tab shows a table with various information divided into rows and columns.
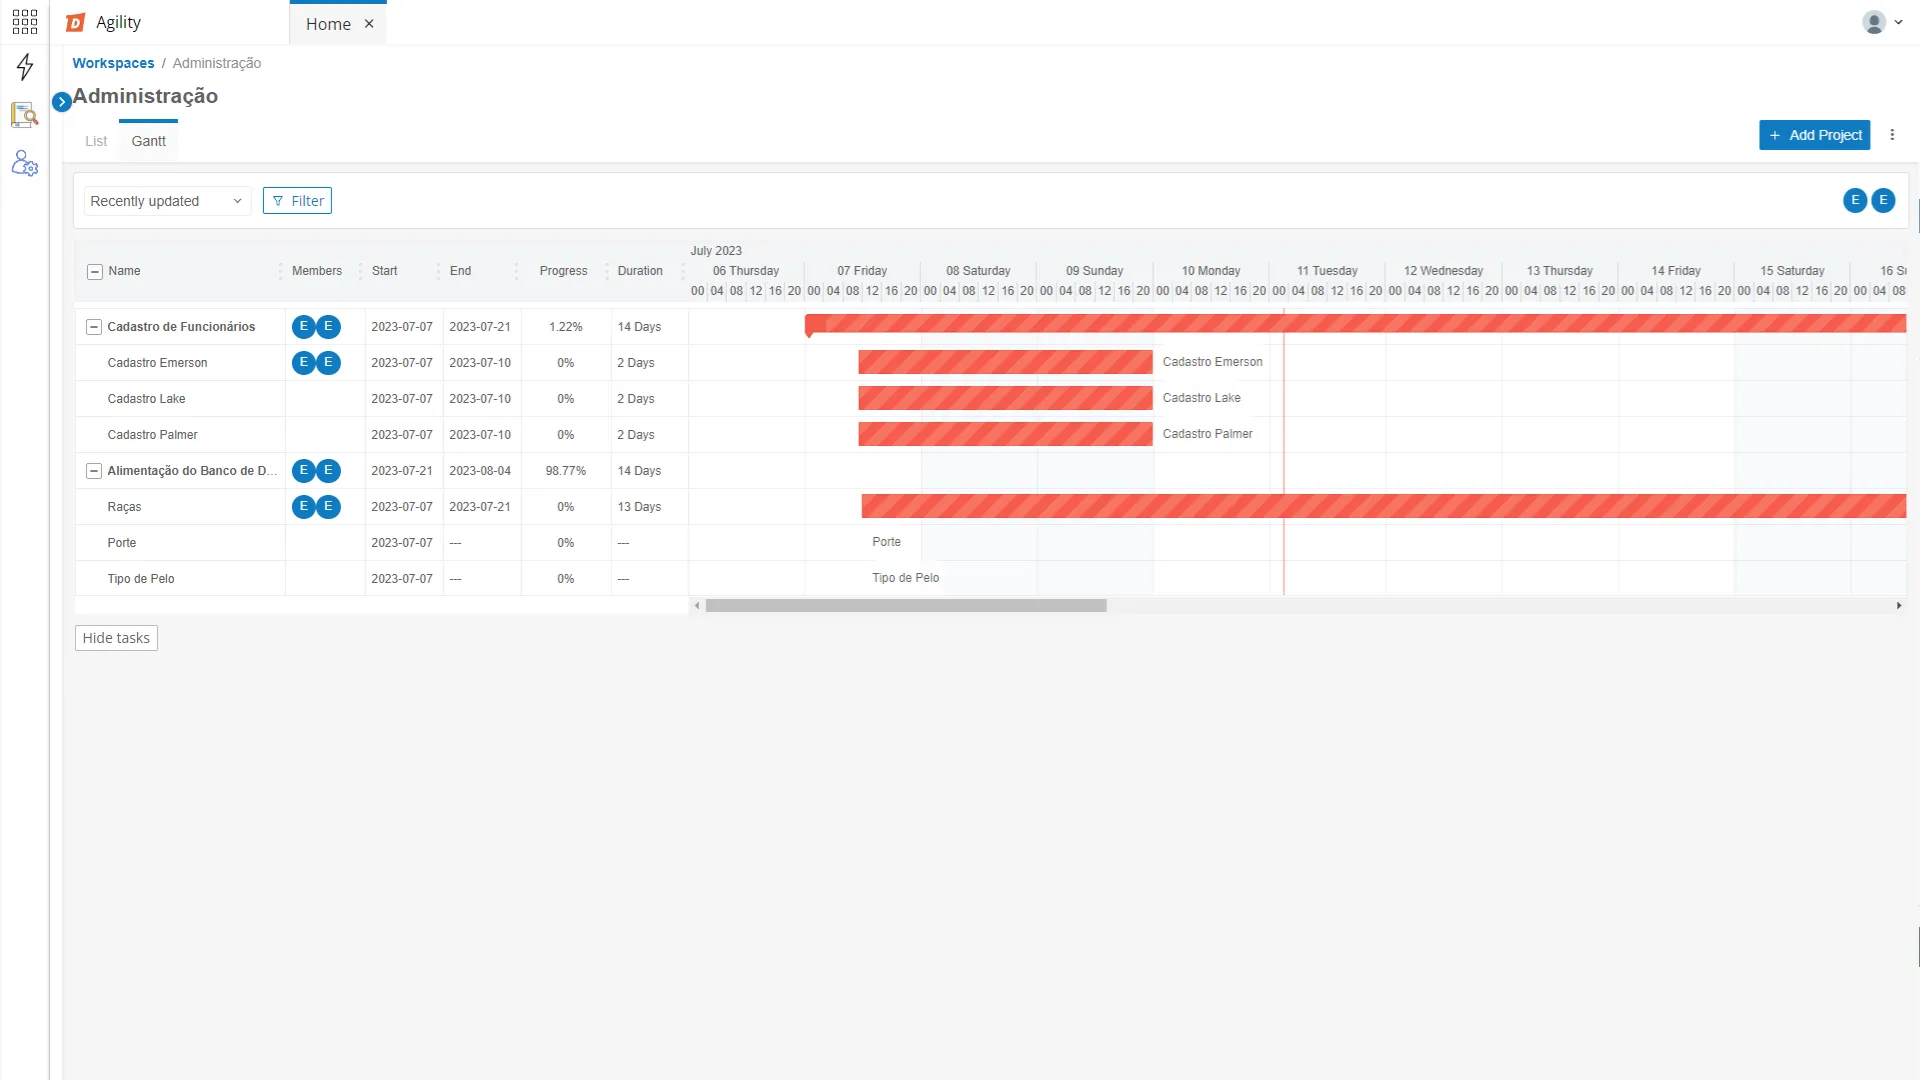
Columns |
|---|
Project Name |
Members list |
Creation date |
Delivery date |
Progress |
Project duration (in days) |
Calendar |
Below each project you can see a list of their respective tasks.
The calendar will display projects in colored bars with their duration, starting from the creation date and ending on the end date.
At the end of the page there is a button with the option to Hide Tasks, which minimizes the table information to show only the calendar bars.
By clicking on the - and + icons next to the project title, it is possible to hide or show the tasks of each project individually.
3. Add Project and Options
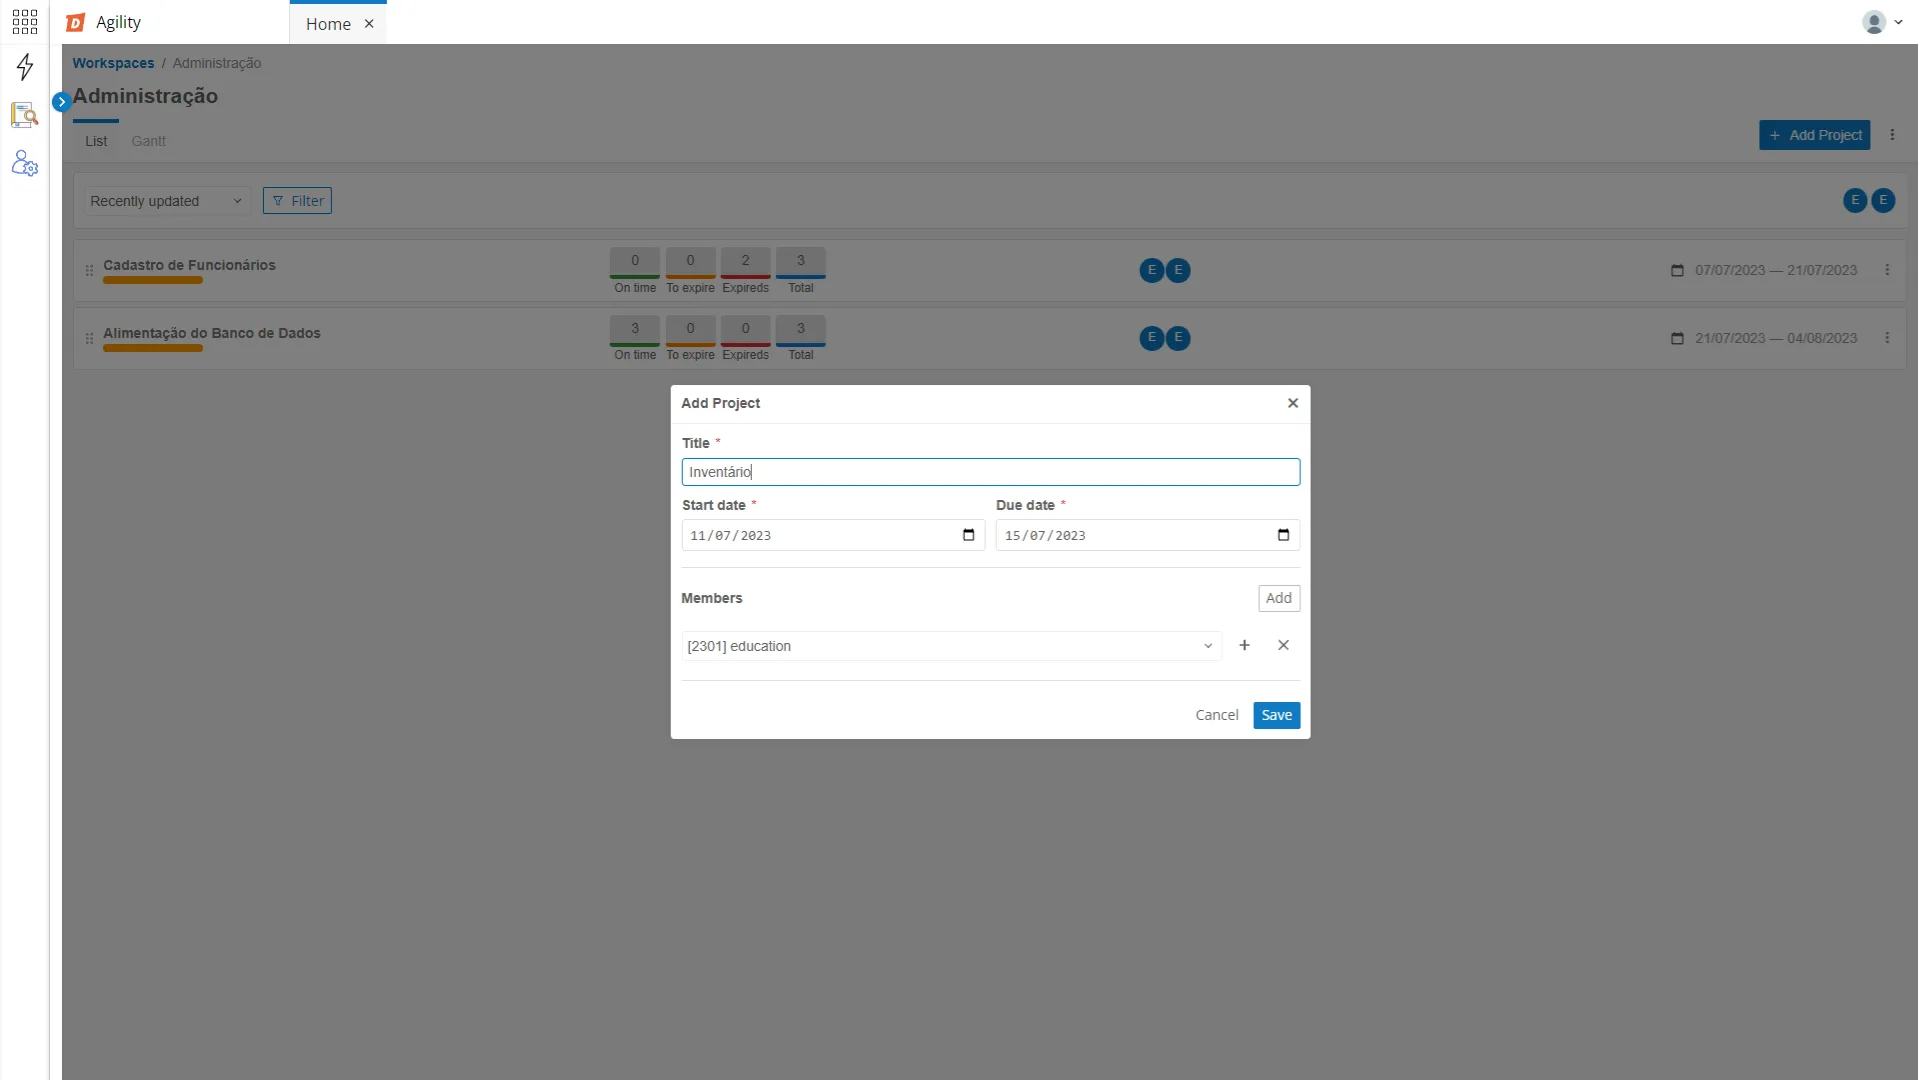
Click the Add Project button in the upper right corner to view the Create Pop-up, where you can enter a name for the new project and add members by typing in their usernames. You can also enter the start date and due date of the project. To finalize the creation, click on Save, or on Cancel to go back to the previous screen.
Click on the icon with three dots to view more options:
Option | Description |
|---|---|
Reload Projects | Refreshes the page; |
Edit Workspace | Allows changing the name and members of the selected Workspace; |
Archive Workspace | Allows archiving the selected Workspace, after user confirmation; |
5. Order and Filters
The box below the title allows selecting the order in which the list of Workspaces appears, with the most recent or the oldest ones appearing at the top. Next to the box, it's possible to filter the selected workspaces by project users;
6. Project List
Below the search box, all projects from the current Workspace will be displayed.
7. Title and Progress
On the left side of the project, the project Name will be displayed, and below it, the completion progress bar for the project. To open the selected project, click on the Name.
The progress bar is defined by:
- The sum of the total estimates of all completed tasks;
- The sum of the total estimates of all tasks;
- The Progress is the percentage calculated with the total estimates of completed tasks over the total estimates of all tasks;
On the left side of the Name, an icon will be displayed, allowing to change the view order of the projects on the list by clicking and dragging with the mouse.
8. Metrics
The colored rectangles show the project Metrics:
- On Time: shows the total tasks, of the project, with the "Delivery Date" greater than 24h from the current date/time;
- Due Soon: shows the total tasks, of the project, with the "Delivery Date" that will be due within 24h from the current date/time;
- Overdue: shows the total tasks, of the project, with the "Delivery Date" earlier than the current date/time;
- Total: sum of all tasks of the project;
9. Members
The colored circles show the members involved in the project. The letter inside each circle is the initial of the member's username. If there are more than 4 members in the project, only the first 3 members and a circle with ellipsis will be shown.
10. Dates
The calendar icons on the right side of the project display the creation date of the first task of the project and the delivery date of the last task.
11. Quick View
By clicking anywhere on the project, a box with the tasks of the selected project will be shown for quick view.
Glossary
- Project – "In the context of the Scaled Agile Framework (SAFe), a project is a temporary initiative or effort with the objective of creating a unique product, service, or result. However, in SAFe, the term 'project' is replaced by the concept of 'Program Increment' (PI), which is a fixed period of time during which work is planned, executed, and delivered by agile teams."
- Gantt – "The Gantt chart is a project management tool that shows the planned tasks and schedule of a project in the form of a horizontal bar chart. It provides a visual overview of project activities, their durations, and the dependencies between them."