Service Portfolio Maintenance
Before getting started
It is necessary to have a contract created
It is necessary to have an activity recorded in a service portfolio
Procedure
- Access the Main Menu > Processes > Portfolio and Catalog Management > Portfolio;
- The list of Portfolios created will appear, as well as the "Maintenance" button, on the right side;
- By clicking on Maintenance, you will maintain the portfolio of your choice. First, there are the following steps:
Step | Description |
|---|---|
Choose action | In this step, we have two options: Link and Unlink. When you select one of the options, you will be asked another question about what you want to link or unlink |
What do you want to link? | We will also have two options in this step: Contract and Activity. Select which one you want to unlink of your Portfolio |
In what do you want to link to? | If you selected the option "Contract" in the previous step, it will appear as default to link an Activity to your contract. If you have previously selected the "Activity" option, then the Contract will come by default to be linked to it |
Related content | It is a link to create/edit a contract, which, when selected, will open the contract registration screen. Upon completion, the system returns to the portfolio maintenance page |
Linking activity to contract
- This option is for when you answered in the steps:
- Choose the action - Link;
- What do you want to link? - Activity;
- In what do you want to link to? - Contract.
- The system returns all active activities found for the selected business/technical service. Active activities are those with an active status.
- Select the activities you want to link. For the Activities, we have the following information:
- Name
- Filter Option
- ID
- Portfolio
- Service
- Linked Contracts
- See details
- When the activities are selected, two buttons will appear,
- One, showing the number of activities that have been selected; and
- The other "Compare selected activities", where will appear a pop-up with the information of the selected activities.
After the Activities list, it is time to select the Contract you want to link.
- The system displays the list of active contracts found in the previously selected activities.
- Select the contract you want to link. For Contracts, we have the following information:
- Contract Name
- Filter Option
- Client
- Provider
- Portfolio, which will return to the number of portfolios found in the selected contract
- See details
- Contract details arrow, which when selected loads the following contract information: Type of Agreement/Contract, Contract Date, Support Hours, Currency, Contract End Date
- After properly linking the Activities and Contracts you want, click on "Next".
- The "Standard features for bulk action" screen will be displayed. On this screen, you will complete some information that will serve as the standard characteristics of bulk action for all activities and contracts that you have selected.
- We have the following fields to complete as a standard feature for bulk action:
Field |
|---|
Operation conditions |
Start date |
Calendar |
Service time |
Opening template |
Email closure template |
Executing group |
Approving group |
Flow |
6. Below, you will see the activities and contracts you have previously selected to link to earlier.
7. All the activities and contracts selected in this step will receive the same features informed above. If the system identifies a feature for a service/contract, the previous feature will not be subscribed.
8. After setting all fields, click on "Next".
9. The "Review items that will be changed" screen be presented.
10. On this screen, you will be able to review all the features, activities, and contracts that you selected during the entire linking process to see if it is in accordance with your needs. Note that this screen is for viewing only, and no information can be changed.
11. If you agree with the information, click on "Confirm". You will see a message "Do you want to confirm and continue with the bulk actions?", Click on "Yes, confirm" to finish the linking.
12. When linking activity to a contract, the system will return to the portfolio screen.
Unlinking
- This option is for when you answered in the steps:
- Choose the action - Unlink;
- What do you want to unlink? - Contract;
- What do you want to unlink to? - Activity.
- The system returns all active contracts found for the selected portfolio. Active portfolios are those with active status.
- Select the contract you want to unlink. For Contracts, we have the following information:
- Contract Name
- Filter Option
- Client
- Provider
- Portfolio, which will return to the number of portfolios found in the selected contract
- See details
- Contract details arrow, which when selected loads the following contract information: Type of Agreement/Contract, Contract Date, Support Hours, Currency, Contract End Date
- When contracts are selected, two buttons will appear,
- One, showing the number of contracts that have been selected; and
- The other "Compare selected contracts", where will appear a pop-up with the information of the contract selected.
After the list of Contracts, it is time to select the Activity you want to unlink.
- The system displays the list of Activities found in the selected portfolio.
- Select the activity you want to unlink. For Activities, we have the following information:
- Name
- Filter Option
- ID
- Portfolio
- Service
- Linked Contracts
- See details
- Click on "Next" to proceed.
- The "Standard features for bulk action" screen will be displayed. On this screen, you will complete some information that will serve as the standard characteristics of bulk action for all contracts and activities that you have selected.
- We have the following fields to complete as a standard feature for bulk action:
Field |
|---|
Operation conditions |
Start date |
Calendar |
Service time |
Opening template |
Email closure template |
Executing group |
Approving group |
Flow |
6. Below, you will see the activities and contracts you have previously selected to unlink to earlier.
7. After setting all fields, click on "Next".
8. The "Review items that will be changed" screen will be presented.
9. On this screen, you will be able to review all the features, activities, and contracts that you selected during the entire unlinking process to see if it is in accordance with your needs. Note that this screen is for viewing only, and no information can be changed.
10. If you agree with the information, click on "Confirm". You will see a message "Do you want to confirm and continue with the bulk actions?", Click on "Yes, confirm" to finish the unlinking.
11. When unlinking an activity from a contract, the system will set the end date in the service x contract linking.
12. The activity will not be retired and it would maybe re-linked at any time with the same contract or with other contracts.
Requiring attachment in ticket registration
New option: An option to make the attachment mandatory in the ticket record was added to the incident/request link to the contract screen:
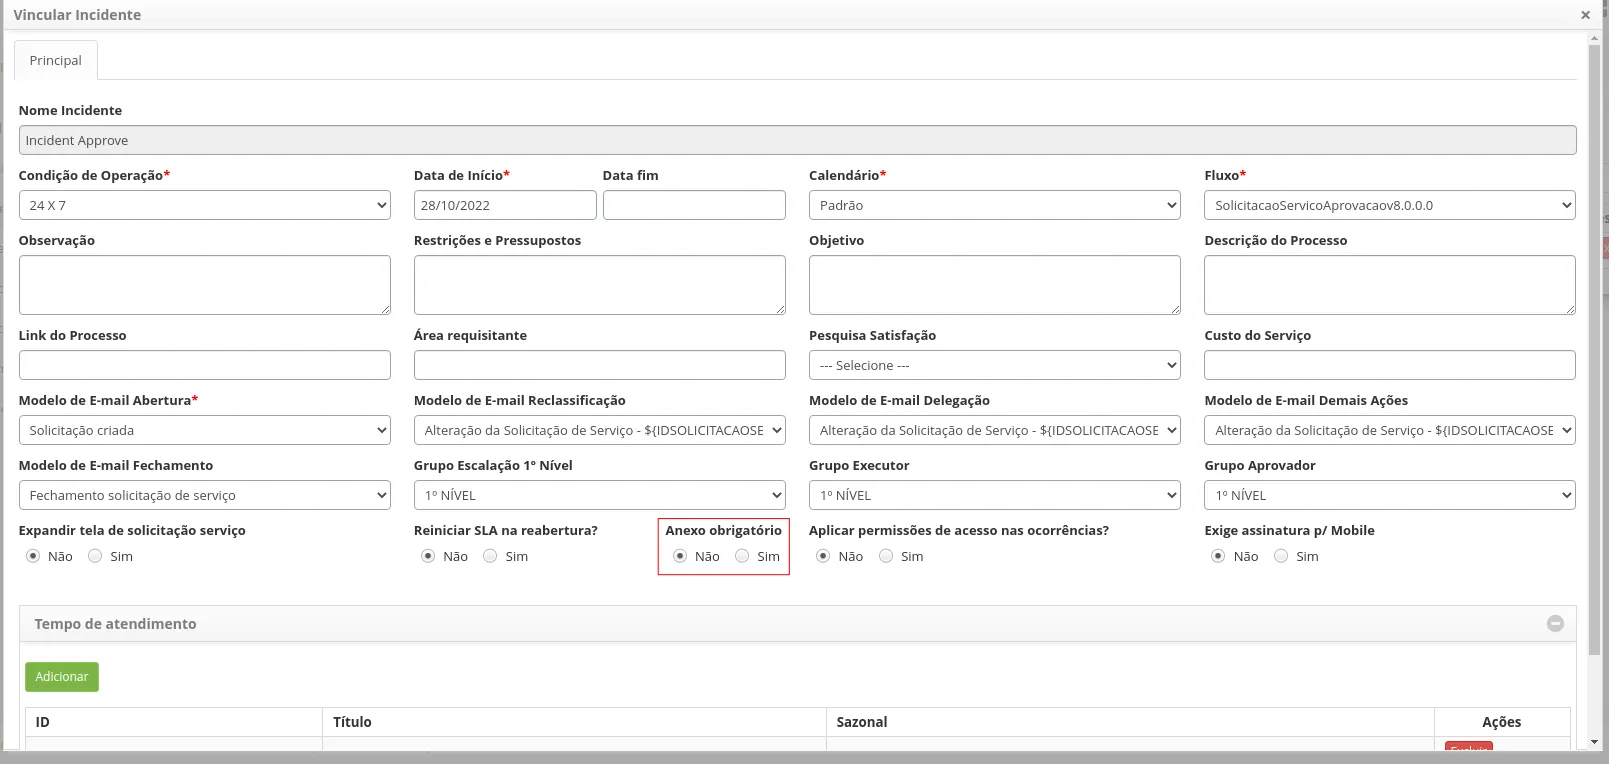
Allowing the user to define whether the attachment is mandatory for this activity, when launching the ticket on the screens:
- Incident/Request;
- SmartPortal;
- Experience Center and Webservices:
- /servicerequestincident/create
- /servicerequestincident/save
Behavior: When the user defines that the attachment is mandatory in the portfolio, the system automatically starts to require an attachment to open a ticket in the aforementioned functionalities.