Desktop of the Service Desk
The Desktop of the Service Desk is a place where tickets that have been opened for activities linked to your group are available, and where you can view multiple information about a ticket.
Before getting started
To have access to the features of the Ticket Management interface, it is essential:
To have workgroup permissions; and
Also access to service catalogs;
In addition, to having at least one ticket in the attendance queue.
Procedure
Access the menu Processes > Ticket Management > Ticket.
Interface
The home screen of Ticket Management is the analysts of attendance interface with requests and/or incidents that are in process or awaiting attendance. This interface consists of Search Features, Ticket Listing, and Main Menu.
Search
It is possible to use the search bar to make it easier to search for a specific ticket - by entering the number - or a set of tickets with similar characteristics - using several attributes - such as:
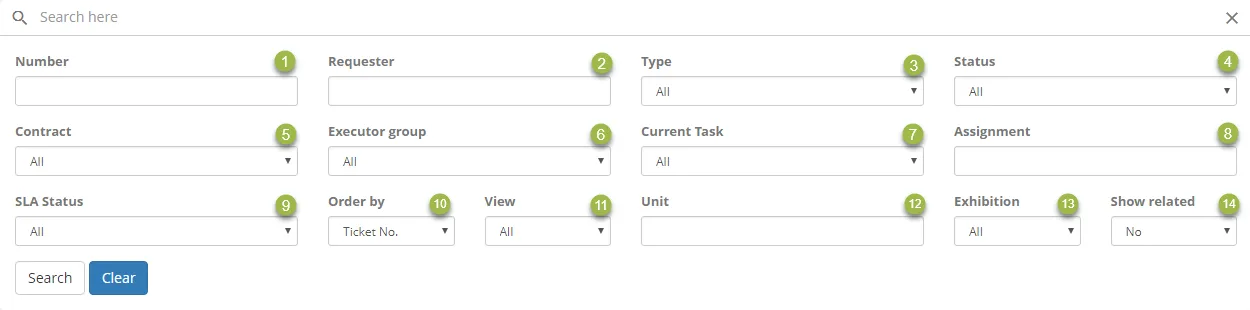
1: Number of the ticket;
2: Requester of ticket (Who requested);
3: Type – of service (Request, Incident, or Procedure);
4: Status of ticket (status/expressions registered in the flow);
5: Contract to which the ticket is linked;
6: Executor group (Current set of people who can attend the service);
7: Current task (User task in the flow);
8: Assignment of ticket (Current person who's attending the service);
9: SLA status: Normal, Expired, Waiting for approval and others;
10: Order by: Ticket No, Date/time of creation, Activity, Service, Assignment, Priority, Status, Date/time of limit, and Date of the last update;
11: View: All tickets or just the ones I can track or execute;
12: Unit – of Requester;
13: Exhibition: All, Chat – just opened by this channel - and critics – only critical incidents;
14: Option to show related tickets – in the attendance list;
To apply a search based on the filters you set, use the "Search" button. After making the search, the icon will change to identify the search status, such as:


It is possible to clean all filters selected and return to default format by clicking on "Clear".
Tickets List
In the list we can see the tickets available in an attendance queue - based on group permissions - where we find the following columns:

1: Selecting Ticket(s) – to delegate or suspend/reactivate them;
2: Ticket number;
3: Priority – of attendance (SLA);
4: Service;
5: Request (Request/Incident);
6: Requester;
7: Contract;
8: Created by (Who created the ticket);
9: Creation date of the ticket;
10: Task – of flow;
11: Current group – of attendance;
12: Unit;
13: Assignment – the responsible for the attendance;
14: Task status – in the flow;
15: SLA – maximum time of attendance;
16: Deadline – for attendance;
17: SLA Status;
Located in the upper right side, we can see a series of icons representing, respectively:

Pagination:
1: Back to the first page;
2: Back one page;
3: Number ticket identifier number of the start page;
4: Number ticket identifier number of end page;
5: Number total of tickets;
6: Advance one page;
7: Advance to the last page;
Delegation:
8: Delegate – ticket(s) to a group;
⚠️ Attention!
The "Automatic Update" button will come by default not enabled in the CITSmart Parameters, to enable it, it is necessary to change parameter 418 to "YES". This way, the button will be available on the ticket screen to automatically refresh the page every 25 seconds.
Page Updating:
9: Automatic Update (25 and 25 seconds);
10: Update List – to refresh manually the page;
Reports
11: Reports;
12: (Other) Options;
- a: Suspension/Reactivation – of ticket;
- b: Change columns (to custom the list);
Ticket options:
Clicking on a ticket in your attendance queue will present you the actions available:
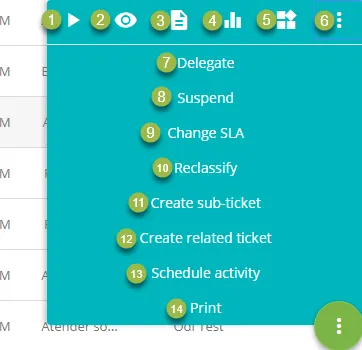
Main options:
1: Open;
2: View;
3: Description – view the description without opening it;
4: Reports;
5: View Flow – of service;
6: More options (present the items below);
Secondary options:
7: Delegate;
8: Suspend;
9: Change SLA;
10: Reclassify;
11: Create Sub-ticket;
12: Create related ticket;
13: Schedule activity;
14: Print;
⚠️ Attention!
These options are based on the permissions given to your profile, so you may not be able to use all of the options above.
Main Menu
Global Vision:
- List – Presents a list with the tickets in your queue;
- Team management – Ticket management in a Kanban view;
- SLA status – A synthetic view categorized by SLA status;
- Flow status – Current status (expressions registered for a flow) of tickets assigned to a group;
Map View:
- Map – Allows to view tickets registered for attendance in a unit;
View by Search:
- Filters – When selecting a filter (expressions registered for a flow) will present the tickets according to the selected item;
Other options
- Schedule: Allows to view events related to Ticket, Change, Problem and Release;
- Summary: A quantitative report of tickets;
- Advanced Search: It allows you to perform more detailed ticket searches as well as the information generated in your attendance;
- Audit: It presents all changes that occur to a ticket whether automatic or manual;